Router Firmware Exploring
For various reasons, I have a lot more free time for the next few weeks. I thought I’d use this time to try write up on and potentially finish some weekend projects I’ve been doing for the past year or so. One of this projects is emulation of my home’s router, so that I can satisfy my curiosity of poking around and playing with it without risk of my ISP getting mad at me and cutting off my Internet.
Note: Most of the content I got from Azeria Lab’s guide on emulating firmware. I had actually purchased the book “Arm Assembly Internals & Reverse Engineering” on a whim after seeing it at a bookstore at a mall after work. The book contains a similar guide (It was authored by the founder/CEO of Azeria Labs) with a smidge more information.
Starting out
First off, I started by identifying my router’s firmware by looking at the settings page of my router’s gateway setup page.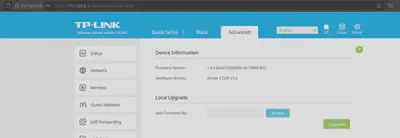
Let’s download the latest firmware, and use binwalk to try see if we can extract any filesystem(s) from it.

Running binwalk on this binfile we get some data out, which luckily for us, includes a squashfs filesystem which seems to follow a linux file layout. I’ve seen other routers before encrypting their firmware and making it more difficult for us to analyse, but lucky for us, it’s all here.


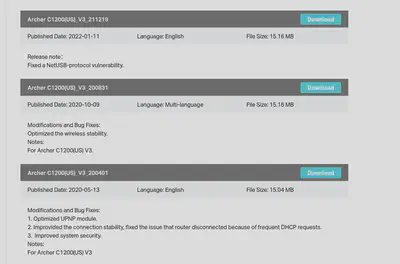
But before going further, remember the page we downloaded the firmware from? The release notes mentioned something intriguing.
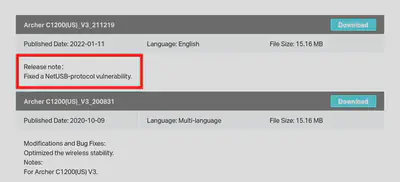
Curiously, I can’t find any mention of a NetUSB vulnerability that fits the timeframe of the update (Unless they’re pushing an update for a vulnerability from 2015), so I thought we’d investigate and do some Patch Diffing / Binary Diffing.
The idea is to download the old firmware, do the same extraction process, and see what files were changed with the newer one. Hopefully this can provide some insight on what the vulnerability was.
I downloaded the two firmware updates, extracted the squashfs filesystem, and wrote a quick and dirty python script to check the differences.
#!/usr/bin/env python
import hashlib

def sha256sum(filename):
    try:
        with open(filename, 'rb', buffering=0) as f:
            return hashlib.file_digest(f, 'sha256').hexdigest()
    except Exception as e:
        print(e)
        return 0


first_dir = './_C1200v3_us_ca-up-3.0.6_Build_20200401_rel.71690_signed.bin.extracted/squashfs-root/'
second_dir = './_C1200v3_us_ca-up-3.0.7_Build_20200831_rel.59087_signed.bin.extracted/squashfs-root/'


from os import walk

def get_files(my_dir):
    f = []
    for (dirpath, dirnames, filenames) in walk(my_dir):
        f += [(dirpath + "/" if dirpath[-1] != "/" else dirpath) + _ for _ in filenames]
    return f

first_files = get_files(first_dir)
second_files = get_files(second_dir)

super_hash_first = dict()
super_hash_second= dict()

for f in first_files:
    super_hash_first[f[f.find("/squashfs-root/"):]] = sha256sum(f)
for f in second_files:
    super_hash_second[f[f.find("/squashfs-root"):]] = sha256sum(f)

for some_key in super_hash_first.keys():
    if "/www/webpages/" in some_key:
        continue
    if some_key not in super_hash_second:
        print(f"{some_key} not in second!")
        continue
    if super_hash_second[some_key] != super_hash_first[some_key]:
        print(f"{some_key} is different!")


/var/webpages/, which contained the HTML of the router’s gateway HTTP server, were different, but those changes seemed to be unimportant (filename differences of a file with a seemingly random number that was probably the unix timestamp, e.g /www/webpages/pages/frame/basic.1585742034873.htm), which was probably the result of some tooling updating the filename. So I excluded it from my checker.
The /media seemed to be symlinks that were breaking my script, so those can be ignored. The /etc/webpage_time were just two files with a different UNIX timestamp in it.
checktypes.lua I haven’t explored much, mostly because as much as I tried, I couldn’t get a Lua decompiler to to work with the specific version of Lua that was used to compile that file (It was a compiled Lua file, not plaintext.).
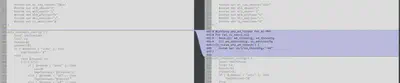
The shellscript tplink_brcm.sh seemed interesting at first glance, and upon analysis on a text-based differ, it seemed to have added a few lines of code, though unfortunately nothing really interesting.

The wl.ko file seems the most interesting to me, and it appears to be a linux driver, possibly the closed-source Broadcom wireless LAN driver ? (I’m not entirely sure on this).
We can use r2diff (or rz-diff in my case, using the rizin fork of radare2) to see what functions are different.
> rz-diff -t functions ./lib/modules/2.6.36.4brcmarm/kernel/drivers/net/wl/wl.ko ../../_C1200v3_us_ca-up-3.0.6_Build_20200401_
rel.71690_signed.bin.extracted/squashfs-root/lib/modules/2.6.36.4brcmarm/kernel/drivers/net/wl/wl.ko
From an excerpt, it doesn’t seem like any existing functions were modified though, with only new functions being added in.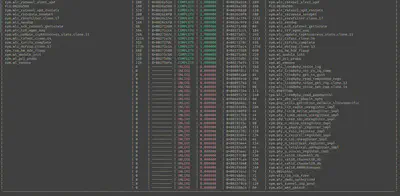
I also used bindiff to compare the two files, which confirmed it.
I did look a the disassembled/decompiled code and tried to make sense of it, but haven’t dug much. Searching the function names online didn’t yield too many results either. Perhaps investigation for a future blog post?
By the way, using bindiff was kind of annoying because I neither have a paid IDA Pro license (which is needed for ARM support and python scripting) nor Binary Ninja (There is a free cloud version, but it doesn’t have python scripting), so I had to use the Ghidra extension which didn’t had the least support/features.
Going back to the router firmware, I was going to try emulate it using qemu.
Following the Azeria Lab’s guide, I chose to use an ARM Debian system as my Virtual Machine, and followed the instructions here from debian’s official page on running it on qemu.
One hiccup I faced was that I was on an Arch Linux host machine, and did not have the /usr/share/qemu-efi-aarch64/QEMU_EFI.fd file. I would later find the edk2 version that worked fine for me instead.
After adding my ssh keys to the debian filesystem, the exact command I used to run the virtual machine was the following:-
> qemu-system-aarch64 -m 8G -M virt -bios /usr/share/edk2/aarch64/QEMU_EFI.fd -nographic -drive if=none,file=debian-1
0-openstack-arm64.qcow2,id=hd0 -device virtio-blk-device,drive=hd0 -device e1000,netdev=net0 -netdev user,id=net0,hostfwd=tcp:
127.0.0.1:5555-:22,hostfwd=tcp:127.0.0.1:5557-:80 -cpu cortex-a57 -device virtio-rng-pci
For some reason, I needed to specify -cpu cortex-a56 instead of -cpu max as the guide suggested. I found this out through experimenting and I’m still not exactly sure why it worked.
I also added hostfwd=tcp:127.0.0.1:5557-:80 to portforward the VM’s port 80 to the host’s port 5557 for later on. (Port 5555 is for the SSH, and I didn’t use port 5556 because I was using it for something else in my testing previously)
One thing to note is that if you were getting internet to your machine via a LAN cable as I was, your VM won’t be getting internet. This confused me a lot, as I wondered why I wasn’t getting any internet in it, before realising my wifi was turned off.
Loading your VM will take a while, but when you get to the login prompt you’ll know it worked, at which point you can ssh into the machine with the debian user, and change the root password with su passwd then login as root, as the guide I linked said.
Remember the squashfs filesystem directory from earlier? We now want to put this into our VM. You can do this the same way you put your SSH key into the VM, or you can use scp and transfer with scp -P 5555 -r squashfs-root debian@127.0.0.1:/home/debian/router/.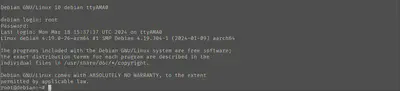
The Azeria Labs guide tells you to chroot into the squashfs filesystem (You can find debian’s guide for this here) to sort of simulate what the router does. The guide also suggests to disable ASLR and enable something called “legacy VA layout”.
Thankfully, the “hooks” part it mentioned (which is needed for the Tenda firmware) isn’t needed in our case.
The guide asks to execute a certain file, rcS, on startup, which apparently triggers a few things in embedded linux.
This wasn’t working on my setup, so I inspected the rcS file.
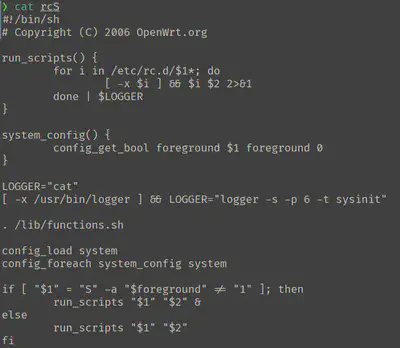
But anyway, it seems to be checking if the first argument in the command is S and the foreground environment variable is set, in which case it runs the run_scripts function in detached mode (It adds a & at the end), otherwise it runs the function normally.
And the run_scripts functions seems to run all the scripts within the /etc/rc.d/ directory, and running the function $2 which is the second argument.
Looking at the excerpt of the files (/etc/rc.d/S50uhttpd and several others), you can usually see there are start and stop functions, so I made an educated guess that the second argument should be start or stop.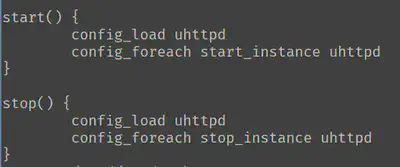
So in the end, my run.sh function looked something like this.
sudo sh -c "echo 0 > /proc/sys/kernel/randomize_va_space"

sudo sh -c "echo 1 > /proc/sys/vm/legacy_va_layout"

sudo mount --bind /proc /home/debian/router/squashfs-root/proc
sudo mount --bind /sys /home/debian/router/squashfs-root/sys
sudo mount --bind /dev /home/debian/router/squashfs-root/dev

# Trigger startup
sudo chroot /home/debian/router/squashfs-root /bin/sh -c "/etc/init.d/rcS S start"
(Note that I added S start to the command, and also that I copied the squashfs directory over the /home/debian/router/.)
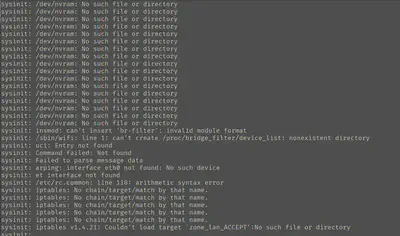
Waiting for this to finish running will take a while, and this will trigger also trigger a lot of logs, most of which are probably the result of missing hardware that we don’t have to worry about.
But before that, let’s take a look at the output of ifconfig for reasons that will become clear later.
It should look something like this.
debian@debian:~$ sudo ifconfig
eth0: flags=4163<UP,BROADCAST,RUNNING,MULTICAST>  mtu 1500
       inet 10.0.2.15  netmask 255.255.255.0  broadcast 10.0.2.255
       inet6 fec0::5054:ff:fe12:3456  prefixlen 64  scopeid 0x40<site>
       inet6 fe80::5054:ff:fe12:3456  prefixlen 64  scopeid 0x20<link>
       ether 52:54:00:12:34:56  txqueuelen 1000  (Ethernet)
       RX packets 278  bytes 29721 (29.0 KiB)
       RX errors 0  dropped 0  overruns 0  frame 0
       TX packets 273  bytes 28147 (27.4 KiB)
       TX errors 0  dropped 0 overruns 0  carrier 0  collisions 0

lo: flags=73<UP,LOOPBACK,RUNNING>  mtu 65536
       inet 127.0.0.1  netmask 255.0.0.0
       inet6 ::1  prefixlen 128  scopeid 0x10<host>
       loop  txqueuelen 1000  (Local Loopback)
       RX packets 24  bytes 2032 (1.9 KiB)
       RX errors 0  dropped 0  overruns 0  frame 0
       TX packets 24  bytes 2032 (1.9 KiB)
       TX errors 0  dropped 0 overruns 0  carrier 0  collisions 0
Note that you have the eth0 and lo interface. You should also test that you have internet access, which you should unless you’re getting internet through a LAN cable on your device.
I would also suggest running netsat -tlnp to see what ports are being listened on, so we can identify any changes later on when we start emulating the firmware.
debian@debian:~$ netstat -tlnp
(Not all processes could be identified, non-owned process info
will not be shown, you would have to be root to see it all.)
Active Internet connections (only servers)
Proto Recv-Q Send-Q Local Address           Foreign Address         State       PID/Program name
tcp        0      0 0.0.0.0:22              0.0.0.0:*               LISTEN      -
tcp6       0      0 :::22                   :::*                    LISTEN      -
We can see that only port 22, the SSH port, is being listened on.
Before running the emulate.sh script to chroot into the firmware router’s file, since it would trigger a lot of logging on your console that you can ignore, I would suggest installing tmux or something similar to have another terminal emulator session, or you can simply SSH into the system on another tab (with ssh debian@127.0.0.1 -p 5555, though this sometimes breaks for me too), for reasons that would become clear later.
Right, now run the script (as root)!
After running the shell script, you should notice that you can’t SSH into the VM for some reason.
Running netstat -tlnp, you can see there are several other services that have started.
Active Internet connections (only servers)
Proto Recv-Q Send-Q Local Address           Foreign Address         State       PID/Program name
tcp        0      0 127.0.0.1:20002         0.0.0.0:*               LISTEN      2729/tmpServer
tcp        0      0 0.0.0.0:80              0.0.0.0:*               LISTEN      2754/uhttpd
tcp        0      0 0.0.0.0:53              0.0.0.0:*               LISTEN      2685/dnsmasq
tcp        0      0 0.0.0.0:22              0.0.0.0:*               LISTEN      494/sshd
tcp6       0      0 :::22                   :::*                    LISTEN      494/sshd
Hmm, interesting, what is tmpServer? And a uhttpd server is running on port 80. Port 22, the ssh port, still seems to be running, and we can’t access it! And we can’t access port 80 either when we go onto the web browser, even though we forwarded it to port 5557! What’s going on?
Adding to the confusion, if you run
wget http://localhoston the VM, you should get a valid page out. But you also will no longer have internet access.
This stumped me for a while, until I ran ifconfig again.
debian@Akronite:/root$ ifconfig
br-lan: flags=4163<UP,BROADCAST,RUNNING,MULTICAST>  mtu 1500
       inet 192.168.1.1  netmask 255.255.255.0  broadcast 192.168.1.255
       inet6 fec0::20a:ebff:fe13:7b00  prefixlen 64  scopeid 0x40<site>
       inet6 fe80::20a:ebff:fe13:7b00  prefixlen 64  scopeid 0x20<link>
       ether 00:0a:eb:13:7b:00  txqueuelen 1000  (Ethernet)
       RX packets 51  bytes 4826 (4.7 KiB)
       RX errors 0  dropped 0  overruns 0  frame 0
       TX packets 12  bytes 1112 (1.0 KiB)
       TX errors 0  dropped 0 overruns 0  carrier 0  collisions 0

eth0: flags=4163<UP,BROADCAST,RUNNING,MULTICAST>  mtu 1500
       ether 00:0a:eb:13:7b:00  txqueuelen 1000  (Ethernet)
       RX packets 2613  bytes 189453 (185.0 KiB)
       RX errors 0  dropped 0  overruns 0  frame 0
       TX packets 2557  bytes 319641 (312.1 KiB)
       TX errors 0  dropped 0 overruns 0  carrier 0  collisions 0

lo: flags=73<UP,LOOPBACK,RUNNING>  mtu 65536
       inet 127.0.0.1  netmask 255.0.0.0
       inet6 ::1  prefixlen 128  scopeid 0x10<host>
       loop  txqueuelen 1000  (Local Loopback)
       RX packets 17364  bytes 1181464 (1.1 MiB)
       RX errors 0  dropped 0  overruns 0  frame 0
       TX packets 17364  bytes 1181464 (1.1 MiB)
       TX errors 0  dropped 0 overruns 0  carrier 0  collisions 0
The way qemu works is that it created a default virtual NIC interface or something, and gave it the IP address 10.0.2.15 here in this case. It would usually use this IP internally and translate network requests to and from the machine, replacing this IP in whatever packet headers there are, so that it can connect to the internet, as well as using this IP to port-forward the SSH port (port 22) earlier to port 5555.
There are many ways to configure the network topology on qemu, for example if you want multiple qemu VMs to be able to connect to each other but not access the Internet. Or you can configure it so that your real router sees your VM as a separate machine on the network, which can be convenient so that you don’t have to port-forward everything. I spent a long time reading and watching videos on this topic to try troubleshoot my problem. I’ll stick to the default method for simplicity for now.
The problem lies in that it seems that in the initialisation process, a new interface called br-lan was created and switched to, and it uses a different IP address (192.168.1.1), which confuses qemu and hence, qemu doesn’t forward any network requests.
Side-Note: if you
ripgrepthe stringbr-lan, you can find evidence that this interface is created and referenced in several scripts.
The easiest/quickest way to fix this is with the following command.
ifconfig br-lan 10.0.2.15 netmask 255.255.255.0 broadcast 10.0.2.255
Replacing the IP address with the one from the output of the earlier command.
Note that it might break a few things, since there is probably code in the firmware that hard-codes and assumes the IP of
192.168.1.1, but for now it is fine.
Anyway, now when we can try access port 80 of the VM on our web browser on our host!
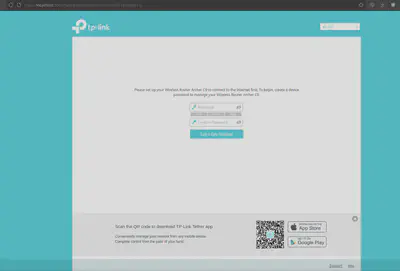
Seems like we have hit the setup page of the router! And now we can install gdb or whatever tools we want on the virtual machine, and play around and hack to our heart’s content.
Remember from the netstat output earlier that it is uhttpd running the web server for this page? Maybe we can try play around and attack it, and debug any attacks on gdb with gdb -p $(pidof uhttpd).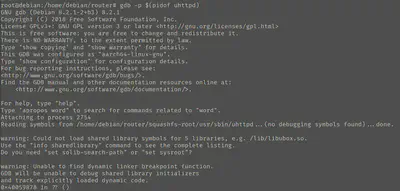
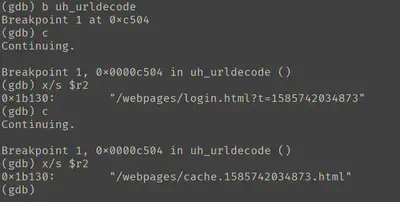
For example, I found a function sym.uh_urldecode through disassembling and a decompilation, I could then put a breakpoint and step through the execution.
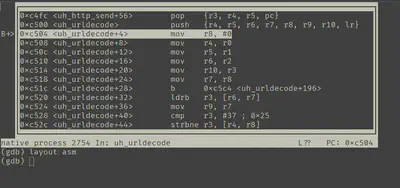
You can try get gef or pwndbg to work too for a smoother experience, though in my experience in the past, in general gdb plugins don’t seem to play very well on non-x86 architectures (Though maybe it’s just me, gef claims to be good for this purpose.), so I try keep it to vanilla gdb.
An additional note: It seems that this web server, uhttpd, is open source and part of the OpenWRT project..
Though this is great since it makes understanding it a lot easier since there is a lot of documentation available, including the source code itself, I was a bit disheartened when I found out because I would assume that a major open source project like OpenWRT would be thoroughly vetted, especially since uhttpd is quite a small project, making less of a chance of a flaw existing in it.
But I still have a bit of hope that maybe some flaw might exist. Perhaps the vendor use an older version of uhttpd that contained an flaw, or perhaps they modified the source code to add their own additional closed-sourced features, potentially introducing new bugs. (If I’m not mistaken, the OpenWRT project is GPL licensed, so any modifications to uhttpd should be made publicly available somewhere, though I wouldn’t put it past them to “forget” to include this.)
Hope you enjoyed the blog post, if I have a next part to this, it would likely be more on actually analysing the firmware, probably exploring uhttpd and trying to find flaws, and maybe poking around at other things I find in the firmware (The tmpServer? Maybe I’ll try harder to find the NetUSB vulnerability? Maybe I’ll look at other public services besides the HTTP server?). Not sure yet, do let me know what you want to see, and of any thoughts you had on this post.
But my next blog post will probably be on a different topic, I have a few other old “weekend projects” I want to blog about before continuing on in this investigation. Hope to see you then!
Naavin Ravinthran
Computer Science Graduate
My interests include cybersecurity, osdev, and graphics programming.